
Markers
Markers
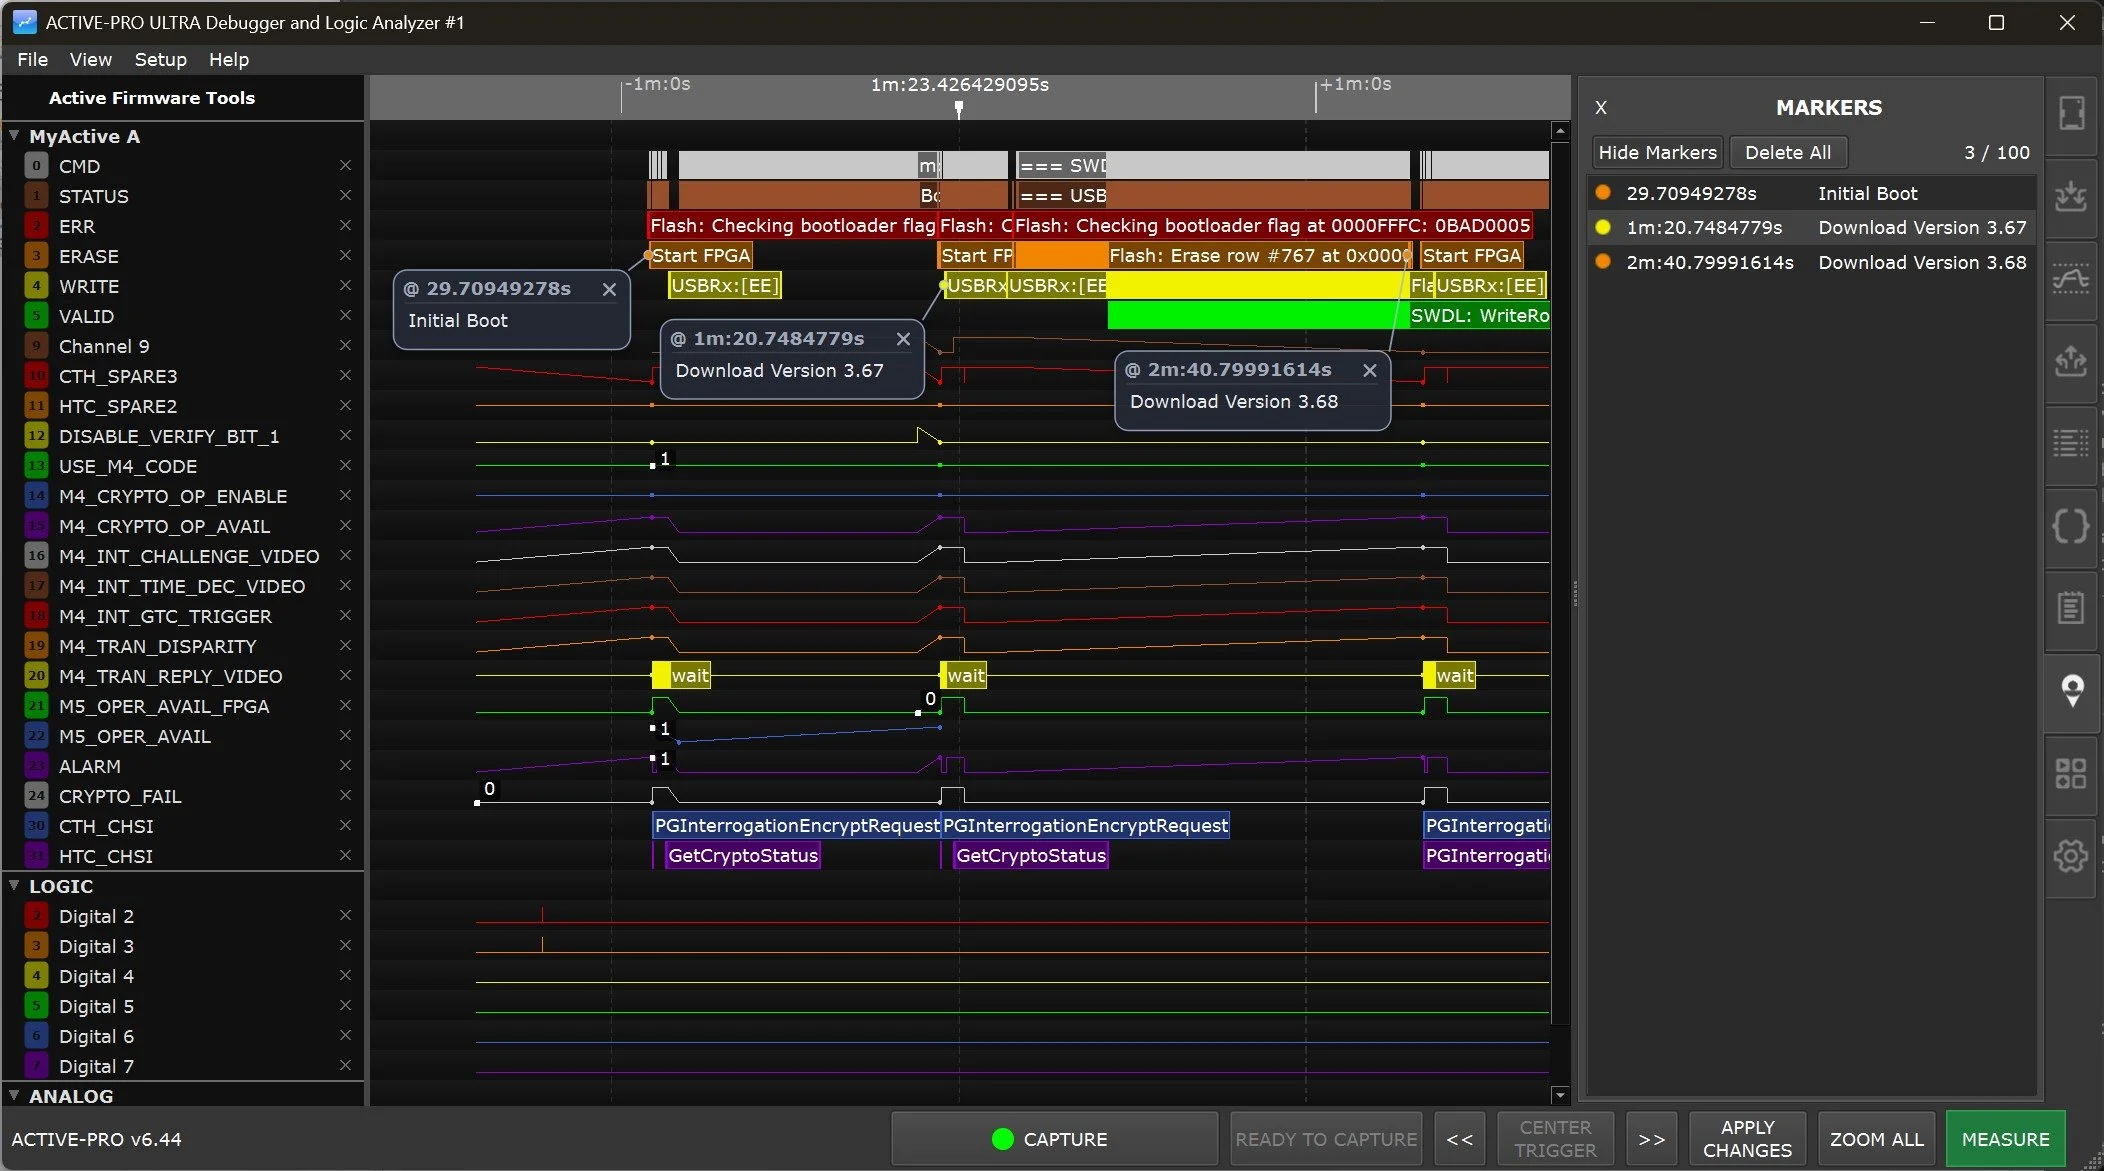
Markers let you pin a note to an exact point on the timeline. Each marker is anchored to one specific sample, a single channel at a single instant in time, and floats a small note card next to it with whatever text you type. As you pan and zoom, the marker stays locked to that point in your data.
Use markers to annotate findings as you review a capture: flag the glitch you were hunting, label the start of a state machine transition, leave a reminder for a colleague, or build an ordered trail of everything interesting in a long trace. Markers are saved inside the capture file, so they travel with the .active file when you share it.
What a Marker Looks Like
A marker has two parts drawn directly on the waveform:
- The anchor dot, a small dot in the channel's own color, sitting exactly on the sample the marker is pinned to.
- The note card, a rounded callout connected to the anchor dot by a thin leader line. The card shows the marker's timestamp in its header (for example,
@ 3.4935s) and your note text below it.
The marker is pinned to a specific channel and a specific time. If you place a marker on the CH2 analog trace, it stays on CH2, it does not jump to another row. The anchor dot and the list entry are tinted with that channel's color so you can tell at a glance which signal each marker belongs to.
Markers are drawn on the waveform area itself, so they are visible no matter which right-side tab is open. The Markers tab is where you manage the full list of them.
Adding a Marker
- Find the point you want to mark and position the mouse over it, on the channel row you want to pin it to.
- Right-click to open the context menu.
- Choose Add Marker (the first item in the menu).
The marker is placed at the time directly under your mouse, on the row you right-clicked. A new note card appears with the text cursor already in it, ready for you to type.
You can add markers to any data row, logic, analog, Active Debug text, graphed values, or decoded bus packets.
Maximum of 100 markers. A capture can hold up to 100 markers. The counter in the Markers tab (for example,
7 / 100) shows how many you have used. If you try to add one past the limit, a message appears in the status bar and no marker is added. Delete a few you no longer need to free up room.
Editing the Note
The note field is always editable, just click into a card and type. The card grows automatically to fit your text, including multiple lines, so the note never scrolls or gets clipped. There is no Save step; the text is stored with the marker as you type.
The first line or so of your note also appears in the Markers tab list, with line breaks flattened to a single line for the list view. A marker with no text yet is shown as (empty) in the list.
Arranging the Cards
When several markers are close together their cards can overlap. To move a card, drag it by its header strip (the bar across the top that shows the timestamp). The leader line stretches to follow, always pointing back to the anchor dot, so the marker still clearly indicates the exact sample.
The card's position relative to its anchor is remembered, so it stays where you put it as you pan and zoom. A card will never sit directly on top of its own anchor dot, it always keeps a short leader line so the marked point stays visible.
Deleting Markers
| Action | How | |
|---|---|---|
| Delete one marker | Click the X button in the top-right corner of that marker's note card | |
| Delete all markers | Click Delete All in the Markers tab toolbar |
Delete All asks for confirmation first (for example, "Delete all 7 markers?") so you cannot wipe them out by accident.
The Markers Tab
The Markers tab lists every marker in the current capture and gives you tools to manage them.
Opening and Closing the Tab
Open the Markers tab by clicking the marker icon in the tab strip on the far right of the window, or choose View > Show Markers from the menu bar. Close the panel with the X button at the top-left of the tab.
The Toolbar
| Control | Description | |
|---|---|---|
| Hide Markers / Show Markers | Toggles the note cards on and off (see below). The button label changes to reflect what the next click will do. | |
| Delete All | Removes every marker, after a confirmation prompt. | |
Count (n / 100) |
Shows how many markers you have placed, out of the maximum of 100. |
The Marker List
Below the toolbar, every marker is listed on its own row, sorted in chronological order (earliest time first). Each row shows:
- A color dot in the channel's color.
- The marker's timestamp.
- The note text, condensed to a single line.
The timestamps line up in a fixed column so the list is easy to scan. Hover a row to see the full, un-flattened note text as a tooltip.
Click any row to jump to that marker. The waveform re-centers on the marker's time and the marker's card briefly flashes to draw your eye to it. This makes the Markers tab a fast table of contents for a long capture, click down the list to walk through every point of interest in order.
Showing and Hiding Markers
The Hide Markers button (in the Markers tab toolbar) hides all the note cards and their leader lines, while leaving the small anchor dots in place. This is useful when you have many markers and want to see the underlying waveforms clearly without the cards covering them. The anchor dots remain so you can still see where every marker sits. Click Show Markers to bring the cards back.
How Markers Track Your Data
Because a marker is pinned to a real point in your captured data, it behaves like part of that data:
- It moves with the waveform. Pan or zoom and the marker stays locked to its sample.
- It hides when its point scrolls off-screen. If you scroll so the marked time is no longer in view, that marker's card and dot disappear until you scroll back to it.
- It hides when its channel is hidden. If you collapse a group or remove the channel the marker is on, the marker is hidden until that row is shown again. The marker still exists, it is just waiting for its row to come back.
- Its color follows the channel. The anchor dot and list dot use the channel's display color, and they respond to the Intensity and Color Mode sliders (Settings tab) exactly like the waveforms do.
Saving and Restoring Markers
Markers are stored inside the capture. When you save a capture to an .active file, all of its markers, their text, positions, and the channel and time each is pinned to, are saved with it. Open that file later, on any PC, and every marker reappears exactly where you left it.
Markers belong to one capture. Markers are part of the capture data, not a global preference. Starting a new capture clears the markers, and they are not carried over from a previous session except by opening a saved
.activefile. Save the capture if you want to keep its markers.
When you use File > Save Between Cursors to save only the portion of a trace between the X1 and X2 cursors, any markers that fall inside that range are saved with the new file and stay correctly aligned to the data. Markers outside the saved range are not included in that file.
Tips
Build a review trail. Drop a marker on each thing you find as you work through a capture, then use the chronological Markers tab list to step through them in order. It is faster than re-finding each spot by hand.
Markers vs. cursors. The X1/X2 cursors measure the time and values between two points and there are only two of them. Markers are unlimited annotations (up to 100) that label individual points and carry your own text. Use cursors to measure, use markers to annotate.
Hand off your analysis. Because markers save into the .active file, you can mark up a capture and send the file to a colleague, who opens it and sees every note exactly where you placed it, alongside the same data.
Tidy the view. If cards pile up while you are zoomed out, use Hide Markers to clear the clutter and keep just the anchor dots, or drag individual cards apart so each note is readable.